
Setting up Redux with your React App
A lot of React developers deal with state management while building their Applications, here is a guide on how to use Redux to manage those states.

When building medium or large-scale applications it's a better practice to use a State management system like Context or Redux.
In this guide, you will learn:
- What Redux is
- How Redux works
- How to setup Redux in a React app
What is Redux?
Redux is a predictable state container for JavaScript apps. It helps you write applications that behave consistently, run in different environments (client, server, and native), and are easy to test. On top of that, it provides a great developer experience, such as live code editing combined with a time-traveling debugger. In layman's terms, It's a state management system for javascript apps.
I personally recommend redux for medium/large scale applications and context for small applications.
How does Redux work?
In Redux you have to remember 3 things:
- Action
- Reducer
- Store
So in redux, you will create only one store and pass the store in your topmost react component. Normally in App Component in src/app.js file or index.js file. Store holds all the app state or global state for the application in Redux.
As the store will be passed to the React application or view part, we can pass any information or command. This is called action in the Redux way. That means you want to dispatch an action to send some command.
Basically the actions will be dispatched to the reducer which is a fancy term of function. The reducer will get the current state from the store and will use the actions to create a new state based on the old state and will update in the store.
Finally, if a view component is connected to the store, it will re-render when the state in the Redux store will be updated.
How to setup Redux in a React app
Installing the dependencies
The first step is installing our dependencies from NPM, so on our command-line interface.
npm i redux react-redux redux-thunk redux-devtools-extension
Redux is stand-alone and react-redux gives us access to several hooks that make life easier, redux-thunk is a middleware that allows you to write action creators that return a function instead of an action, redux-devtools-extension is an optional dependency that I make use of to improve debugging and view states on the web.
Create folders and files
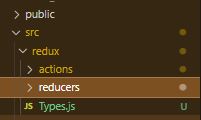
A lot of people set up their folder structures in different ways with Redux, I like to create a redux folder and place my actions and reducers in separate folders within this particular folder, and a separate file in this folder for my types.
By the way, actions are objects that determine what will be done. Reducers, on the other hand, check which action is performed and update the state based on the action.
For the purpose of this article, we are building a small counter app.
Define the Types (constants)
- Start by defining the types that would be used across the application, I like placing this in a separate file (
Types.js) for clarity and reusability. Since we are building a simple project, it's quite easy to determine what all the types would be.
//Types.Js
export const INCREMENT = "INCREMENT";
export const DECREMENT = "DECREMENT";
export const RESET = "RESET";
Create Reducer
- Now create a
counterReducer.jsfile inside the reducer folder you created earlier on.
//counterReducer.js
import { INCREMENT, DECREMENT, RESET } from '../Types.js'
const initialState = {
    counter: 0
}
const counterReducer = (state = initialState, action) => {
  switch (action.type) {
    case INCREMENT:
      return {
        state,
        counter: state.counter + 1
      }
    case DECREMENT:
      return {
        state,
        counter: state.counter - 1
      }
    case RESET:
      return {
        state,
        counter: 0
      }
    default:
      return state;
  }
}

export default counterReducer
For the snippet of code above, we've basically created our reducer by defining its initial state and what happens when a particular action type is fired; A lot of people typically create the reducer with a switch statement, but it is also possible to use an if statement.
Create "Index" Reducer
- Next, we create an
index.jsfile inside of our reducers folder, for an application with more than one reducer, we make use of thecombineReducerfunction, this function turns our reducers into a single reducer that we can pass to thecreateStoreAPI. Now our demo application only has one reducer, but for the purpose of subsequent projects we are going to make use of thecombineReducerfunction.
//Index.js(Reducer)
import { combineReducers } from 'redux'
import counterReducer from './counterReducer'

export default combineReducers({counter: counterReducer})
Create global store
- Now let's create a
store.jsfile inside of oursrcfolder, see this as the logic and the connector between react and redux. To use the store, we are going to add it as a prop inside of a Provider that's going to wrap our entire application.
//store.js
import { applyMiddleware, createStore } from 'redux'
import { composeWithDevTools } from 'redux-devtools-extension'
import thunk from 'redux-thunk'
import rootReducer from './redux/reducers'

const initialState = {}
const middleware = [thunk]
const store = createStore(
  rootReducer,
  initialState,
  composeWithDevTools(applyMiddleware(...middleware))
)
export default store
- Import
store.jsintoIndex.js:
//index.js
import React from 'react';
import ReactDOM from 'react-dom';
import './index.css';
import App from './App';
//New code
import { Provider } from 'react-redux'
import store from "./store"


ReactDOM.render(
  <React.StrictMode>
    <Provider store={store}>
      <App />
    </Provider>
  </React.StrictMode>,
  document.getElementById('root')
);
Create actions
- Let's create the actions that would be used inside of our application, the actions determine what happens to the reducers (this is where your
APIcalls happen too). Inside theactionsfolder, let's createcounterActions.js.
//counterActions.js
import { INCREMENT, DECREMENT, RESET } from '../Types.js'

export const increment = () => {
  return {
    type: INCREMENT,
  };
};

export const decrement = () => {
  return {
    type: DECREMENT,
  };
};

export const reset = () => {
  return {
    type: RESET,
  };
};
- Finally, we can make use of the actions in our app, where we have the counter:
import React from 'react';
import './App.css';
import logo from "./logo.svg"
import { useSelector, useDispatch } from "react-redux";
import {  decrement,  increment, reset, } from "./redux/actions/counterAction";

const App =()=> {
  //dispatch is the hook to fire off our actions
  const dispatch = useDispatch();
  //useSelector helps access the states across the application.
  const counter = useSelector((state) => state.counter);
  return (
    <div className="App">
      <header className="App-header">
        <img src={logo} className="App-logaso" alt="logo" />
        <h1>Redux project</h1>
        <h3>Counter</h3>
        <h3>{counter.counter}</h3>
        <button onClick={() => dispatch(increment())}>Increase</button>
        <button onClick={() => dispatch(reset())}>Reset</button>
        <button onClick={() => dispatch(decrement())}>Decrease</button>
      </header>
    </div>
  );
}
export default App;
Now we should have a fully working react-redux application.
Conclusion
We now have a fully running react-redux application, new reducers can be created in the reducers folder, actions created in the actions folder then connected to the combineReducers export.
While Redux is by far the popular and widely used state management system, I highly recommend using Redux for large and medium-sized applications alone.
There are other state management systems I've come across like Mobx, Context API, and Apollo for GraphQL to use at your disposal likewise.
I hope you enjoyed reading this and would be building your next Redux application without hassle.
Thanks to the creator of Redux and one of my Favorite Software developers, Dan Abramov